How to Enable My Webcam on Windows 10
2 ways to enable auto login in Windows 10
Tashreef Shareef is a software developer turned tech writer. He discovered his interest in technology after reading a tech magazine accidentally. Now he writes about everything tech from Windows to iOS and streaming services... Read more

Windows 10, like its predecessor, also comes with multiple options to sign in to the user accounts. However, what if you don't want any security layers in between and want to auto login in Windows 10?
To secure the Windows users account, you can either use the long and secure password, 6 digit pin, or even biometric sign in if your system supports it. However, if you don't want to punch in PIN or password for each login, you can enable auto login in Windows 10.
In this article, we walk you through the steps to enable auto login in Windows 10.
How to enable auto sign-in in Windows 10
There are two ways to achieve this. You can disable login credentials directly from the User Accounts control or by editing the registry.
1. Enable auto-login with User Accounts
- Press Windows Key + R to open Run.
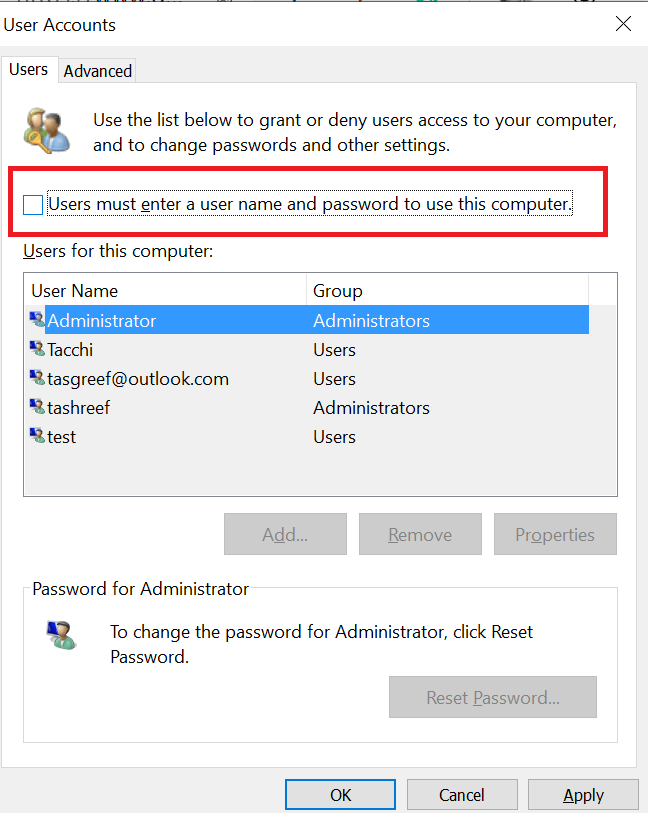
- In the Run dialog box type netplwiz and click OK. This will open the User Accounts window.
- Uncheck "Users must enter a user name and password to use this computer" box.
- Click Apply.
- When prompted to user credentials, enter the username and password to disable password-based login. You may have to enter the username and password twice.
- Click OK to save and exit the window.
- On the next restart, you will be able to log in without entering a password for you account.
How to recover your lost BIOS password in Windows 10
2. Enable auto-login using Registry Editor
- If the first method did not work and Windows 10 still asks for a password during login, try this registry hack.
- Before making any changes to the registry, create a system restore point. It will allow you to restore the PC to normal if something goes wrong.
Edit registry files
- Press Windows Key + R to open Run.
- Type regedit and click OK to open the Registry Editor.
- In the Registry Editor navigate to the following location:
HKEY_LOCAL_MACHINE\SOFTWARE\Microsoft\Windows NT\CurrentVersion\Winlogon
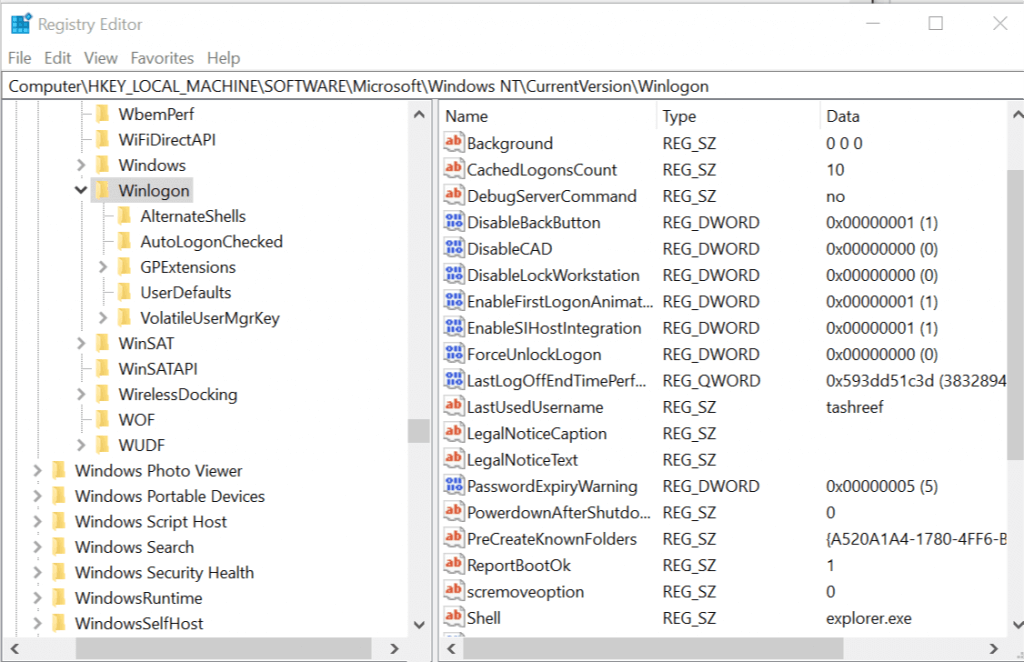
- From the right-pane, double-click on DefaultUserName entry.
- Type your user name and click OK.
- Next, double-click on the DefaultPassword entry. Type your password and click OK.
- In case the DefaultPassword entry does not exist, you need to create it manually. Here is how to do it. If you see the DefaultPassword entry, jump to step 11.
- On the Edit menu, click New and select String Value.
- Name it as DefaultPassword and hit enter.
- Double-click DefaultPassword, type your password and click OK.
- On the Edit menu, click New and select String Value.
- Name it as AutoAdminLogon and hit enter.
- Double-click on AutoAdminLogon entry.
- In the Edit String box, type 1 in the Value field and click OK.
- Exit Registry Editor.
- Restart your computer. You can now log on automatically without entering the password.
Note: We need to mention that this second solution only works for Windows Server 2019, Windows Server 2016, Windows Server 2012 R2
RELATED STORIES YOU MAY LIKE:
- Forgot your Windows 10 Admin password? Here's what to do
- Is your 4K TV blurry while using Windows 10? Try this
- How to sign in to Windows 10 without a password
![]()
Newsletter
How to Enable My Webcam on Windows 10
Source: https://windowsreport.com/auto-login-windows-10/
0 Response to "How to Enable My Webcam on Windows 10"
Post a Comment